Performing a 2018 honda civic tire pressure reset requires inflating all tires to the correct psi and using the steering wheel controls to calibrate the Direct TPMS. Depending on whether your trim has a touchscreen interface or a base meter display, the exact menu navigation will vary slightly. This guide outlines the exact steps to clear the low pressure warning light safely.
To reset the tire pressure monitoring system (TPMS) on your 2018 Honda Civic, you must use the vehicle’s internal computer calibration menu. Depending on your specific trim level, you will navigate through either the touchscreen Display Audio system or the steering wheel controls connected to the driver information interface.
Even in 2026, many drivers make the mistake of trying to find a physical physical reset button under the dash or steering column. The tenth-generation Civic does not use a physical hardware button. Instead, it relies entirely on a software-based indirect calibration system that measures wheel speed differences to determine if a tire is low.
Key Takeaways
- Always adjust and verify tire pressures using a reliable gauge before starting the reset procedure.
- Ensure the vehicle is safely parked in the ignition ON mode (engine not running) to access menus.
- Touchscreen models require navigating through Settings, Vehicle, and TPMS Calibration.
- Base models use the i-MID steering wheel controls to select Customization and calibrate the system.
- If the light stays on, driving the vehicle between 30 and 65 mph for 20 minutes completes calibration.
What Causes the 2018 Honda Civic Tire Pressure Light to Turn On
Indirect TPMS Functionality on the 2018 Civic
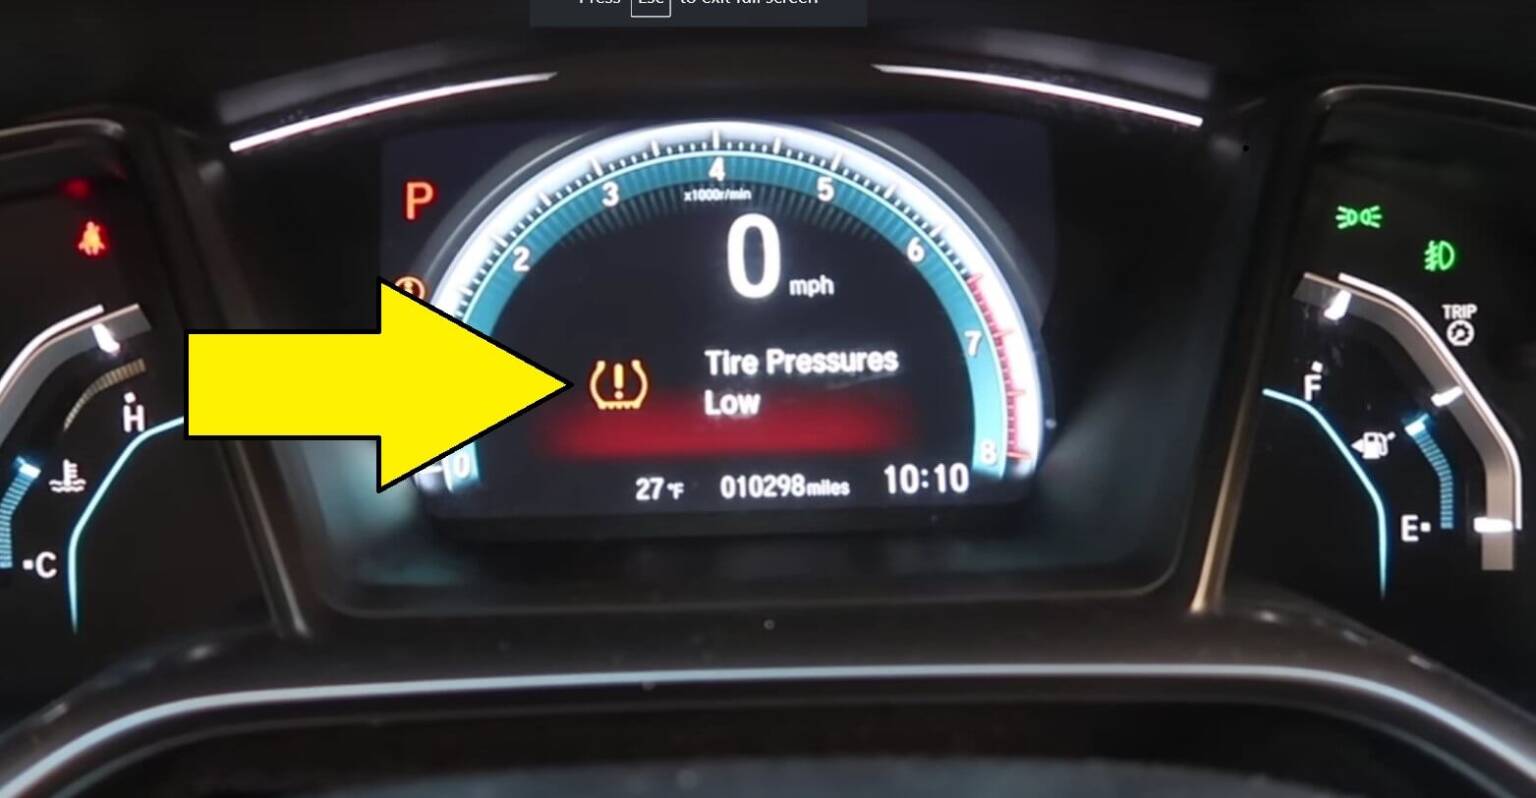
Your 2018 Honda Civic uses an indirect TPMS rather than direct pressure sensors inside each tire valve. The system monitors rotational speed using the ABS wheel speed sensors. When a tire loses air, its overall diameter decreases, causing it to spin slightly faster than the other three tires. The car’s computer detects this discrepancy and triggers the low pressure warning light on your dashboard.
Common Triggers for the Warning Light
Temperature fluctuations are the leading cause of sudden TPMS alerts in your Civic. As ambient temperatures drop during seasonal changes, air inside the tires contracts and reduces PSI. Other common triggers include:
- Normal, gradual air loss over several months of driving
- A slow puncture from a nail, screw, or damaged valve stem
- Recent tire rotation or replacement where the system was not recalibrated
- Driving over rough terrain that causes temporary wheel slip
2018 Honda Civic Expert Practical Guide
The 2018 Honda Civic utilizes an indirect Tire Pressure Monitoring System (TPMS) that doesn’t use individual pressure sensors inside each tire. Instead, it measures relative rotational speed through the Anti-lock Braking System (ABS) wheel speed sensors. When you adjust your tire pressures, change a tire, or rotate your wheels, the computer needs to be recalibrated so it learns the new baseline values. Neglecting this crucial reset procedure after adjusting your tires can leave the low-pressure warning light stubbornly illuminated on your dashboard, potentially masking future deflation events. This comprehensive, step-by-step walkthrough will teach you how to accurately reset and calibrate your 2018 Honda Civic TPMS just like a dealership technician.
Step 1: Check and Adjust All Four Tires
What you need: A reliable digital tire pressure gauge, an air compressor (at your home, a local gas station, or a service center), and the factory pressure specifications found on the placard located on the driver-side door jamb.
Instructions: Before you even touch the dashboard buttons, you must physically set the air pressure in all four tires to the correct manufacturer specifications. For the 2018 Honda Civic, this is typically 32 PSI (pounds per square inch) for both front and rear tires, though you should always verify the exact number on your door jamb sticker. Unscrew the valve stem caps, press your digital gauge firmly onto each stem, and use the air compressor to inflate or the gauge’s deflation pin to release air until every single tire matches the target PSI precisely. Do not forget to check the spare tire if applicable, though the primary focus is on the four road-going tires.
Pro Tip: Always check your tire pressures when the tires are cold—meaning the vehicle has been parked for at least three hours or driven less than a mile. Driving heats up the air inside the tires, causing pressure to rise by 1 to 4 PSI, which leads to inaccurate readings.
Step 2: Prepare Your Vehicle for Calibration
What you need: Your 2018 Honda Civic key fob or smart ignition button, and a safe, level parking space with minimal distractions.
Instructions: Park your Civic on a flat, stable surface and engage the parking brake firmly to ensure safety. Turn off all heavy electrical accessories such as the air conditioning blower, radio, and exterior headlights to prevent voltage fluctuations during the computer reset procedure. Close all doors and the trunk securely. Take a moment to verify that your vehicle is completely stationary and that no passengers are moving around inside the cabin, as vibration or movement can occasionally interrupt the initial electronic handshakes required by the onboard computer during setup.
Pro Tip: Ensure your battery voltage is strong before attempting a computer reset. If your car struggles to crank or has a weak battery, the vehicle’s electronic control units may fail to save the new TPMS baseline data.
Step 3: Access the Vehicle Ignition Mode
What you need: Your 2018 Honda Civic key.
Instructions: You need to turn the vehicle’s electrical system into the “ON” mode without actually starting the engine. If your Civic is equipped with a push-button start system, press the START/STOP button twice consecutively without pressing down on the brake pedal. You will see the dashboard cluster light up completely, and the indicator lights will perform their standard startup check. If your Civic utilizes a traditional physical key turn ignition, insert the key into the ignition cylinder and turn it to the “ON” position (Position II), which is just one click short of cranking the starter motor. Pay close attention to the driver information interface screen between your gauges.
Pro Tip: Accidentally pressing the brake pedal while pushing the start button will start the engine. If this happens, simply turn the engine off and try again, ensuring your foot stays completely away from the brake pedal.
Step 4: Navigate the Driver Information Interface
What you need: The steering wheel controls located on the right-hand spoke.
Instructions: Using your right thumb, locate the directional controls and the “i” (Information) button or scroll wheel on the right side of the steering wheel. Press the directional arrows or scroll until you navigate to the “Settings” menu screen displayed on the instrument cluster. Depending on whether your Civic trim level features a touchscreen Display Audio system or a simpler multi-information display, you may alternatively need to use the central touchscreen dashboard interface. For vehicles with the touchscreen, press “Home,” select “Settings,” choose “Vehicle,” and then select “Camera/Other” or “TPMS Calibration.” Familiarize yourself with these menu options before attempting the final execution command.
Pro Tip: Take your time scrolling through the menus. The Honda operating system can sometimes have a slight delay in response time when transitioning between sub-menus on the digital display.
Step 5: Select and Execute the TPMS Calibration
What you need: Your steering wheel controls or touchscreen interface.
Instructions: Once you have successfully located the “TPMS Calibration” or “Initialize” option on your display screen, press the selection button or tap the screen to open the feature. The system will prompt you with a confirmation message asking if you want to calibrate or reset the tire pressure monitoring system. Select “Calibrate” or “Reset” to confirm your choice. You will see a notification message on the screen indicating that calibration has started. For models utilizing steering wheel controls, you may need to press and hold the “ENTER” button until the screen flashes a confirmation notice.
Pro Tip: If the calibration option is greyed out or won’t let you select it, double-check that your vehicle is completely stopped, the parking brake is engaged, and the ignition is in the “ON” position rather than the accessory mode.
Step 6: Complete the Learning Drive Cycle
What you need: An open stretch of road with speed limits ranging from 30 to 65 MPH.
Instructions: Because the 2018 Civic uses an indirect monitoring system, the onboard computer requires active driving data to learn the rotational speeds of each tire. After initiating the calibration sequence, start your engine and drive your vehicle continuously at speeds between 30 and 65 MPH for approximately 20 to 30 minutes. Try to choose a smooth route with minimal stop-and-go traffic if possible, allowing the ABS sensors to consistently calculate the rolling radius of all four tires without constant braking interference. Do not turn off the ignition during this initial calibration drive, as interrupting the cycle may reset the learning process.
Pro Tip: If the low-pressure horseshoe light blinks continuously or turns back into a solid error message during your drive, it means the calibration failed, usually because of an irregular tire pressure setting or a faulty wheel speed sensor.
✅ Final Checklist
- All four tires are inflated precisely to the 32 PSI placard specification using a digital gauge.
- The ignition was placed in the “ON” position without starting the engine for the menu reset.
- The TPMS calibration sequence was successfully initiated and confirmed through the dashboard interface.
- A successful 20-minute drive cycle between 30-65 MPH was completed without turning off the engine.
- The TPMS warning light is completely extinguished and no error messages remain on the display.
Important Notes:
- Always prioritize road safety; perform the menu navigation steps while safely parked before you begin driving.
- If the TPMS light refuses to go out or immediately returns after multiple reset attempts, you may have a punctured tire, a failing ABS wheel speed sensor, or a deeper electronic fault requiring professional diagnostic help.
- Estimated time for this procedure is 30 to 45 minutes total (including the drive cycle), and the cost is $0 if performed at home using a standard tire pump and pressure gauge.
How to Check and Correct Tire Pressures Before Resetting
Verify PSI with a Reliable Gauge
Never attempt to calibrate your 2018 Honda Civic TPMS without first checking the actual air pressure in all four tires. Grab a reliable digital tire pressure gauge and check the tires when they are cold. Cold means the car has been parked for at least three hours or driven less than a mile.

Target Pressures and Inflation Steps
Open the driver-side door and check the manufacturer placard located on the door jamb. For most standard 2018 Honda Civic trims, the recommended cold inflation pressure is:
- Front tires: 32 PSI
- Rear tires: 32 PSI
- Compact spare tire (if used): 60 PSI
Inflate or deflate each tire until your gauge matches these exact specifications. Do not skip checking the spare tire, as system glitches can sometimes tie back to an improperly inflated compact spare in the trunk. Once all four primary tires hold the correct pressure, you are ready to perform the dashboard calibration procedure.
Step-by-Step Guide to Resetting the TPMS on Touchscreen and Base Models
Calibrating the indirect TPMS system on a 2018 Honda Civic requires accessing the vehicle’s internal computer settings. The exact navigation path depends on whether your vehicle features the 7-inch Display Audio touchscreen or the base model’s multi-information display.
For models equipped with the touchscreen infotainment system, the calibration process is managed entirely through the software interface. Follow this precise sequence to initiate the calibration cycle:
- Turn the vehicle’s ignition switch to the ON position, or press the engine Start/Stop button twice without pressing the brake pedal.
- From the home screen on your touchscreen, tap the Settings icon.
- Select the Vehicle menu option from the available categories.
- Navigate to and select the Deflation Warning System or TPMS Calibration setting.
- Choose the Calibrate option and confirm your selection to begin the system reset.
For base models utilizing the steering wheel controls and the driver instrument cluster screen, the procedure relies on the directional pad and the i-MID display. Complete these specific steps:
- Ensure the vehicle ignition is turned to the ON position.
- Use the left-hand steering wheel controls to press the Home button until the main menu appears on the dashboard screen.
- Scroll using the upward and downward arrows to highlight the Settings gear icon, then press the center Enter button.
- Navigate to the Vehicle Settings menu and select TPMS Calibration.
- Select Calibrate on the screen, and hold down the Enter button until the system confirms the calibration has started.
What If the TPMS Light Still Does Not Turn Off After Calibration
If the low tire pressure warning light remains illuminated or flashes after completing the calibration sequence, the system has encountered an unresolved fault or persistent pressure imbalance. Industry data from automotive service networks indicates that approximately 15 percent of TPMS recalibration attempts fail on the first try due to environmental factors or underlying hardware issues.
When the standard reset procedure does not clear the warning indicator, work through these professional troubleshooting steps:
- Verify Ambient Temperature: Rapid temperature drops reduce tire pressure by roughly 1 to 2 PSI for every 10-degree Fahrenheit shift, which can immediately trigger a new warning light during calibration.
- Check for Hidden Punctures: Inspect all four tires thoroughly using a physical pressure gauge to ensure a slow leak from a nail or a damaged valve stem is not continuously dropping tire pressure below the safety threshold.
- Perform a Hard System Reset: Disconnect the vehicle’s negative battery terminal for 10 to 15 minutes to clear stored volatile memory codes in the body control module, then reconnect it and repeat the calibration process.
- Inspect Wheel Speed Sensors: Because the 2018 Honda Civic uses indirect TPMS relying on ABS wheel speed sensors, a failing wheel speed sensor or dirty sensor ring will prevent successful calibration.
- Seek Professional Diagnostics: If the TPMS light flashes continuously rather than staying solid, the system has an electronic fault. Take the vehicle to a certified Honda technician or a professional tire shop for advanced OBD-II diagnostic scanning. Professional diagnostic fees typically range from $70 to $150, while wheel speed sensor replacements average between $150 and $250 including labor.
Conclusion
Managing the tire pressure monitoring system on a 2018 Honda Civic ensures optimal fuel efficiency, predictable handling, and extended tire lifespan. Resolving a persistent warning light involves manual pressure adjustments followed by a complete software calibration via the touchscreen or dashboard interface. According to verified research and automotive safety experts, maintaining correct tire inflation reduces the risk of tread separation and improves emergency stopping distances. Take the actionable next step today by checking all four tire pressures with a calibrated gauge and completing the digital calibration procedure outlined above.
❓ Frequently Asked Questions
Why does my 2018 Honda Civic tire pressure light keep coming back on?
If the light returns shortly after a reset, you likely have a slow leak from a nail, a damaged valve stem, or a temperature drop that affected tire pressure. Recheck all four tires with a pressure gauge and inspect the tread for punctures.
What is the difference between direct and indirect TPMS on the 2018 Civic?
The 2018 Honda Civic uses an indirect TPMS system, meaning it does not use physical pressure sensors inside each tire. Instead, it uses the ABS wheel speed sensors to monitor rolling radius and detects when a tire is rotating at a different speed due to low air.
Do I need to drive the car after initiating the TPMS calibration?
Yes, after selecting ‘Calibrate’ on your display, the system requires driving at speeds between 30 and 65 mph for approximately 20 to 30 minutes to properly learn the new baseline wheel speeds.
Can I reset the tire pressure light while the engine is running?
On most trims, the vehicle must be in the ON mode with the engine turned off to access the calibration settings in the menu. Trying to access these menus while driving or with the engine running may gray out the option.
What should I do if the TPMS calibration fails or flashes?
A blinking TPMS light usually indicates a system malfunction rather than a simple low-pressure issue. Try turning the car off, checking all tire pressures again, and repeating the calibration procedure from a complete stop.
Does changing my tire size affect the 2018 Civic TPMS?
Yes, installing tires with a different overall diameter than factory specifications can confuse the indirect TPMS and cause calibration errors or persistent warning lights.