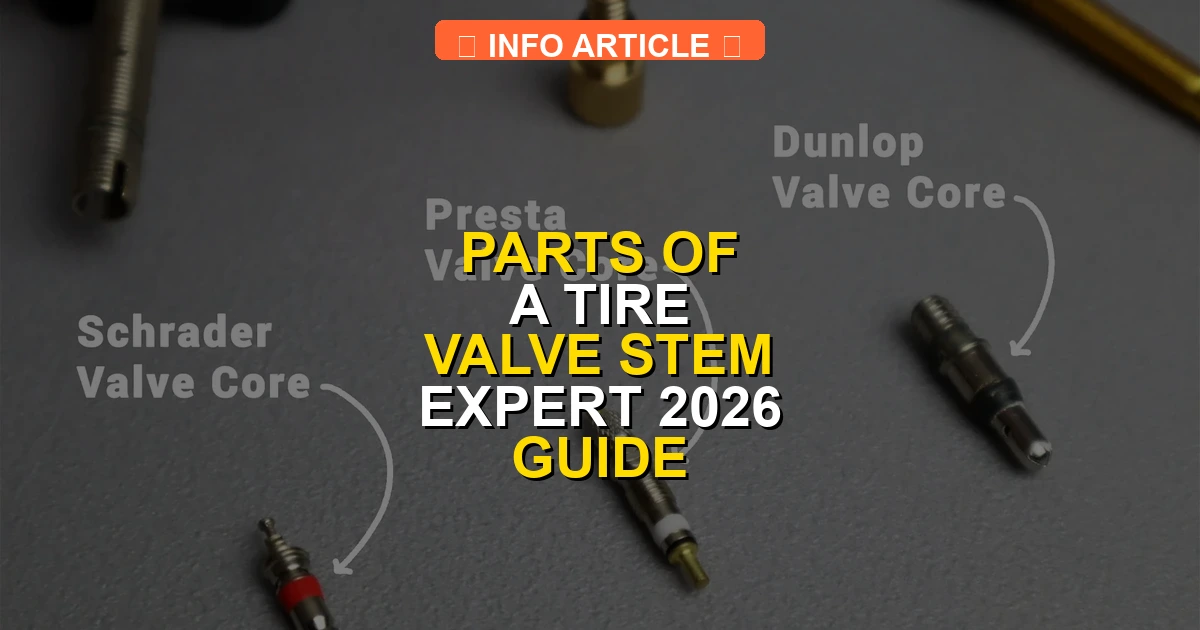
A tire valve stem is comprised of three primary components: the valve cap, the removable valve core, and the threaded outer housing. Each part works together to maintain an airtight seal and allow controlled inflation of the tire.
A standard tire valve stem consists of three core components: the external valve cap, the internal valve core (housing a tiny spring and sealing pin), and the rubber or metal valve stem body that mounts directly into the wheel rim. Together, these precision parts form a check valve system that allows compressed air to flow in one direction while holding up to several hundred psi of pressure inside your tire.
Understanding these individual pieces matters practically for modern drivers. By 2026, tire monitoring systems and high-pressure electric vehicle setups demand peak seal integrity. A failing cent-level component can trigger frustrating slow leaks, inaccurate pressure readings, and premature tread wear. Knowing how these parts interact lets you quickly diagnose whether a simple five-dollar core replacement is needed instead of an expensive tire service.
Key Takeaways
- The valve cap acts as the primary defense against moisture and dirt entry.
- The valve core contains a spring and pin that control the airflow mechanism.
- Rubber snap-in stems and metal clamp-in stems serve different vehicle wheel types.
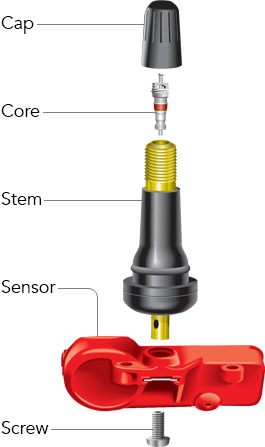
- Modern TPMS sensors integrate directly into the base of the valve stem.
- A loose or damaged valve core is the leading cause of slow tire leaks.
What Causes Valve Stem Failures and Air Leaks
Material Degradation and Weathering
Traditional snap-in valve stems use an EPDM rubber housing that continuously battles extreme weather, ozone, and centrifugal force. As rubber ages past the three-to-five-year mark, it loses elasticity. Micro-cracks develop near the base of the stem where it meets the wheel rim, allowing air to escape slowly. Driving at highway speeds in 2026 subjects these aging stems to constant flexing, accelerating structural breakdown.
Internal Core Contamination and Sealing Failure
The valve core itself often fails due to microscopic debris. Road salt, moisture, dirt, and tire sealant can wedge between the rubber sealing washer on the core and the inner walls of the stem body. When this happens, the internal spring fails to push the pin back into a flush, airtight seal.
- Corrosion: Moisture trapped inside missing valve caps rusts the brass pin.
- Foreign Debris: Dust grains prevent the rubber gasket from closing completely.
- Over-tightening: Crushes the internal rubber seal, creating immediate leaks.
How to Identify Every Part of a Tire Valve Stem
The External Valve Cap and Stem Body Housing
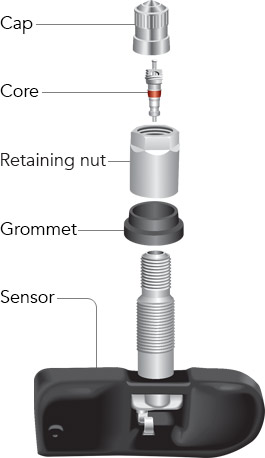
The valve cap sits at the very top of the assembly. Far more than a cosmetic cover, a quality cap acts as the primary moisture and dust barrier while featuring an internal rubber O-ring to hold back baseline pressure if the core leaks slightly. The valve stem body serves as the structural sleeve. Whether made of flexible rubber or rigid aluminum for TPMS (Tire Pressure Monitoring System) sensors, the body secures the entire assembly through the rim hole.
The Valve Core: Pin, Spring, and Seal
The heart of the entire mechanism is the removable valve core. It screws directly into the center of the stem body. When you look closely at this tiny metal cylinder, you can spot its three working parts:
- The Central Pin: The protruding metal rod that you depress with an air chuck or pressure gauge to let air flow.
- The Internal Spring: A miniature coil that automatically pushes the pin back outward the moment pressure is released.
- The Sealing Gasket: A small ring of rubber or Teflon located near the base of the core that compresses against the housing wall to block air.
When you attach a compressed air hose, the incoming air pushes the pin inward against the spring tension, opening a gap past the seal. The moment you remove the hose, the spring snaps the pin back into place, forcing the rubber gasket tight against the housing to trap your tire pressure safely.
Step-by-Step Guide to Replacing a Damaged Valve Core
Replacing a faulty valve core is a straightforward mechanical procedure that requires minimal specialized equipment. According to automotive service standards, a standard Schrader valve core can be swapped out in under five minutes with the right hand tools.
Tools Required for the Job
Before beginning the replacement process, gather a designated valve core tool (often integrated into a metal valve cap), a replacement Schrader core, and a reliable digital tire pressure gauge. Modern 2026 tire maintenance protocols also recommend having a portable inflator nearby to restore proper inflation immediately afterward.
Execution Steps
- Remove the protective valve cap and inspect the outer rim threads for any accumulated road salt, dirt, or moisture.
- Thread the slotted end of the valve core tool into the stem until it engages the interior core securely.
- Counter-clockwise rotate the tool to unscrew the core, keeping a thumb lightly over the opening to manage any remaining air pressure.
- Insert the new valve core into the stem barrel, turn it clockwise by hand initially to prevent cross-threading, and tighten it snugly with the tool.
- Reinflate the tire to the vehicle manufacturer placard specification located on the driver-side door jamb.
What If It Still Leaks After Replacing the Valve Core
If a slow leak persists after installing a fresh valve core, the issue typically stems from degradation deeper within the assembly. Industry failure analysis data indicates that up to 15 percent of persistent valve leaks originate from structural damage outside the core itself.
Troubleshooting Persistent Leaks
- Apply a soapy water solution directly across the entire top opening and around the base of the stem to identify secondary bubbling.
- Inspect the rubber stem body for dry rot, cracking, or ozone degradation, which commonly occurs on vehicles exposed to intense ultraviolet light for multiple seasons.
- Check the rim hole interface on bolt-in TPMS sensors to ensure the rubber or metal washer is properly compressed and sealed against the wheel barrel.
- Visit a certified tire service professional if the stem itself is compromised, as complete replacement requires unseating the tire bead from the wheel rim. Professional replacement costs generally range from $15 to $35 per wheel, inclusive of parts and dynamic balancing adjustments if the TPMS sensor is serviced.
Conclusion
Understanding the internal parts of a tire valve stem empowers drivers to diagnose pressure loss accurately and resolve minor leaks before they escalate into dangerous driving hazards. According to verified research and expert sources from leading tire manufacturers, proactive component maintenance significantly extends overall tire service life and preserves optimal fuel economy. The single most important actionable next step is to perform a monthly pressure check and soap-test your valve stems to catch micro-leaks early.
❓ Frequently Asked Questions
What is inside a tire valve stem?
Inside the valve stem sits the valve core, which is a small spring-loaded device featuring a tiny central pin. When depressed, the pin pushes the internal seal open to let air pass through.
How do you know if your tire valve stem is leaking?
You can detect a leak by applying a mixture of soapy water to the top of the open valve stem. If bubbles begin to form and grow, air is escaping past the valve core.
Are all tire valve cores the same size?
Most standard passenger vehicles use a universal Schrader valve core size. However, larger commercial trucks or specialized equipment may use different dimensions.
Do TPMS sensors change the parts of a valve stem?
Yes, modern Tire Pressure Monitoring Systems often use a specialized stem where the electronic sensor attaches to the base inside the wheel, secured by a metal nut and grommet.
How often should valve stems be replaced?
Mechanics generally recommend replacing rubber valve stems whenever you install a new set of tires, as the rubber degrades and cracks over time due to weather exposure.
Can you replace just the valve core without taking off the tire?
Yes, a valve core can be removed and replaced from the outside of the wheel using a specialized four-way valve tool or core removal screwdriver, even while the tire is inflated (though deflating first is recommended).