Tire sidewalls display a complex series of numbers and letters that dictate vehicle safety and performance. Knowing how to read these codes ensures you select the correct replacement tires for your vehicle’s specific weight and speed requirements. This guide breaks down every major marking so you can interpret tire specifications instantly.
Every tire sidewall features a dense block of raised letters and numbers that dictates your vehicle’s safety, handling, and load limits. Instead of a random jumbled serial number, this alphanumeric string is a standardized recipe for your tire’s physical dimensions and performance ratings.
Knowing how to read these markings prevents costly ordering mistakes when shopping for replacements in 2026. Whether you are upgrading to all-terrain rubber or buying standard commuter replacements online, this guide breaks down every crucial digit so you can choose the exact match for your vehicle.
Key Takeaways
- The letter at the beginning of a tire code indicates its vehicle service type.
- Tire width is always measured in millimeters from sidewall to sidewall.
- The aspect ratio determines the height of the tire sidewall relative to its width.
- Load index and speed rating indicate the maximum weight and safe operating speed.
- The 4-digit DOT code reveals the exact week and year the tire was manufactured.
What Causes Confusion When Reading Tire Sidewalls
The Visual Overload of Embossed Data
Modern tire sidewalls pack an overwhelming amount of information into a very tight space. Manufacturers stamp everything from brand names and treadwear indicators to safety warnings and country of origin right next to the actual technical specifications. When you glance at a tire, your eyes immediately bounce between deep grooves, micro-text, and bold geometric logos. Without a clear map, it is nearly impossible to separate critical sizing data from legal disclaimers and certification numbers.

Mixing Passenger and Light Truck Standards
Adding to the confusion, different vehicle categories use entirely different sizing syntax. A standard passenger car tire might start with a letter P, while a modern crossover or SUV often uses a metric designation without any prefix at all. If you try to apply passenger car logic to a heavy-duty light truck tire, the numbers change meaning entirely. Recognizing the primary sizing format upfront stops you from misinterpreting critical load margins and wheel clearances.
Master Tire Sidewall Decoding in 7 Simple Steps
Understanding the jumble of numbers and letters molded into your tire’s rubber can feel like reading a foreign language. However, this sidewall text is a vital passport containing essential information about your vehicle’s safety, performance limits, and compatibility. Whether you are shopping for replacements, checking your tire pressure limits, or preparing for an upcoming road trip, knowing how to interpret these markings ensures you keep your car rolling safely. This comprehensive walkthrough breaks down every character sequence on the tire so you can read a tire sidewall like an automotive expert.
Step 1: Locate and Clean the Information Area
What you need: A rag or microfiber towel, a bucket of soapy water or an automotive cleaner, and a flashlight if working in low light.
Instructions: Before you can read anything, you need a clear view. Park your car on a flat surface, engage the parking brake, and walk to any tire. Look closely at the outer circular face of the tire between the tread and the metal wheel rim. Over time, brake dust, mud, and road grime accumulate here, obscuring the molded text. Take your damp rag with soapy water and thoroughly scrub the sidewall surface until the raised rubber letters and numbers are completely legible. Dry it with a clean towel if necessary.
Pro Tip: Never use harsh steel brushes or abrasive scouring pads to clean your sidewalls, as this can damage the rubber and weaken the tire’s structural integrity.
Step 2: Identify the Tire Type Service Description
What you need: Your flashlight and a notebook or smartphone to jot down the sequence.
Instructions: Start scanning the long string of alphanumeric characters from left to right. The very first letter you will usually encounter is either a “P” or the absence of a letter, sometimes followed or preceded by other letters. If you see a “P” (such as P215/65R15), it stands for “P-Metric,” indicating the tire was designed primarily for passenger vehicles. If the sequence starts with “LT,” it stands for “Light Truck,” meaning it features a heavier-duty construction for hauling and towing. If it says “ST,” it means “Special Trailer.” If there is no letter at all, it is a “Euro-metric” tire, which often has different load capacities than standard P-metric variants.
Pro Tip: Always match your replacement tires to the vehicle manufacturer’s original intended tire type, especially when switching between passenger and light truck categories.
Step 3: Decode the Section Width and Aspect Ratio
What you need: The alphanumeric code from Step 2 and basic math skills for millimetres.
Instructions: Immediately following the tire type letter, you will see a three-digit number followed by a slash, and then a two-digit number (for example: P215/65R15). The first three-digit number (215) is the section width, measured in millimeters, from the widest point of the outer sidewall to the widest point of the inner sidewall. The two-digit number right after the slash (65) is the aspect ratio. This represents the height of the tire’s sidewall as a percentage of its section width. An aspect ratio of 65 means the sidewall height is 65 percent of the tire’s 215mm width. Lower aspect ratios yield shorter, stiffer sidewalls for sports performance.
Pro Tip: Changing the section width or aspect ratio without adjusting your wheel size can throw off your speedometer calibration and cause rubbing against the vehicle’s wheel well.
Step 4: Understand Internal Construction and Wheel Diameter
What you need: Your continued focus on the alphanumeric sequence.
Instructions: Moving further right along the sequence, look for a single letter and a two-digit number (e.g., P215/65R15). The letter “R” stands for “Radial,” which is by far the most common internal construction method used today, where the body plies run radially across the tire from bead to bead. (Occasionally you might see “D” for diagonal bias or “B” for belted bias on vintage or specialized heavy-duty tires). The final two-digit number in this primary group (15) indicates the wheel rim diameter in inches. This means the tire is specifically engineered to fit securely and safely only onto a wheel with a 15-inch diameter bead seat.
Pro Tip: Never attempt to mount a tire onto a wheel with a mismatched diameter (like trying to put a 15-inch tire onto a 16-inch rim), as this creates a catastrophic safety hazard and air leak.
Step 5: Read the Load Index and Speed Rating
What you need: A standard tire load index and speed rating reference chart (easily searchable online).
Instructions: After a brief space following the rim diameter, you will find a set of numbers and a letter separated from the main string, such as 95H. The two- or three-digit number (95) is the Load Index, which corresponds to the maximum weight a single tire can safely support when properly inflated. A rating of 95 translates to 1,521 pounds per tire. The letter right beside it (H) is the Speed Rating. This denotes the maximum safe operational speed for the tire when loaded correctly. For instance, an “H” rating means the tire is tested and certified for speeds up to 130 mph. Common ratings range from S (112 mph) up to Y (186 mph).
Pro Tip: Never install replacement tires with a lower load index or speed rating than what the vehicle manufacturer originally specified on the door jamb placard.
Step 6: Find the Department of Transportation (DOT) Manufacturing Date Code
What you need: Good lighting to look inside the recessed oval box near the inner rim.
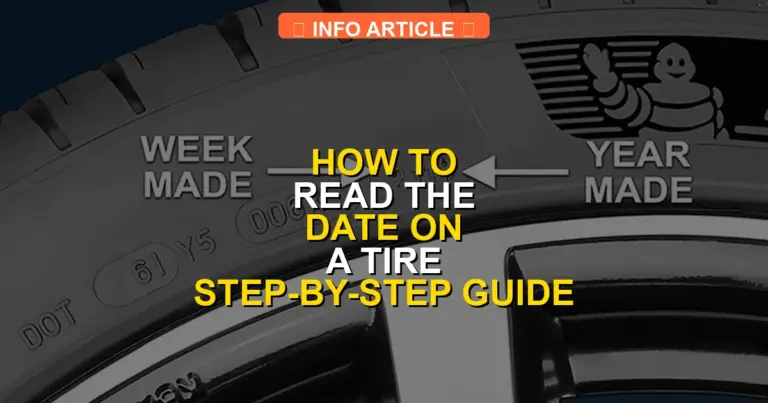
Instructions: Scan the sidewall for the letters “DOT,” which indicate the tire complies with all United States Department of Transportation safety standards. Following the DOT letters, you will see a series of numbers and letters, ending in a crucial four-digit code stamped inside a shallow oval window. This four-digit manufacturing date code reveals the exact age of the tire. The first two digits represent the week of the year (01 through 52), and the last two digits represent the manufacturing year. For example, a code of “2421” means the tire was manufactured during the 24th week of the year 2021.
Pro Tip: Tires degrade over time due to rubber oxidation and UV exposure, even if they have deep tread left. Most safety experts recommend replacing tires that are more than 6 years old.
Step 7: Locate Safety Warnings, Tread Wear, and Temperature Grades
What you need: A keen eye to scan for secondary stampings like UTQG and maximum pressure limits.
Instructions: Turn your attention to the remaining text stamped around the circumference. Look for the Uniform Tire Quality Grading (UTQG) standards, which include ratings for Treadwear (a three-digit number like 400), Traction (AA, A, B, or C), and Temperature (A, B, or C). Also, locate the text specifying “Max Load” and “Max PSI” (pounds per square inch). This tells you the absolute maximum air pressure required to achieve the tire’s maximum load capability, though you should always inflate your tires to the vehicle placard pressure, not the max PSI listed on the sidewall.
Pro Tip: The Max PSI rating is a ceiling limit, not your target daily driving pressure. Always follow the placard sticker located inside your driver-side door jamb for correct daily inflation values.
✅ Final Checklist
- Verified the tire type (P-Metric, LT, or Euro) matches your vehicle’s application
- Checked section width, aspect ratio, and rim diameter for precise wheel fitment
- Confirmed the load index and speed rating meet or exceed factory specifications
- Located the 4-digit DOT manufacturing date code to ensure the rubber is not expired
- Distinguished between vehicle placard inflation pressure and the sidewall’s maximum PSI rating
Important Notes:
- Always inspect your sidewalls for dangerous bulges, deep cracks, or curb scuffs that expose internal cords.
- Seek professional assistance from a certified tire technician if you find mismatched tire sizes or unknown sidewall damage.
- Decoding a full set of four tires typically takes about 10 to 15 minutes and costs nothing when performed yourself.
How to Fix Misunderstandings by Decoding the Primary Size Code
Breaking Down the Main Size String (e.g., P215/65R15)
The core of your tire’s identity lives in the primary size code, usually found stamped in a prominent sequence like P215/65R15. Every single character in this sequence represents a strict physical measurement:
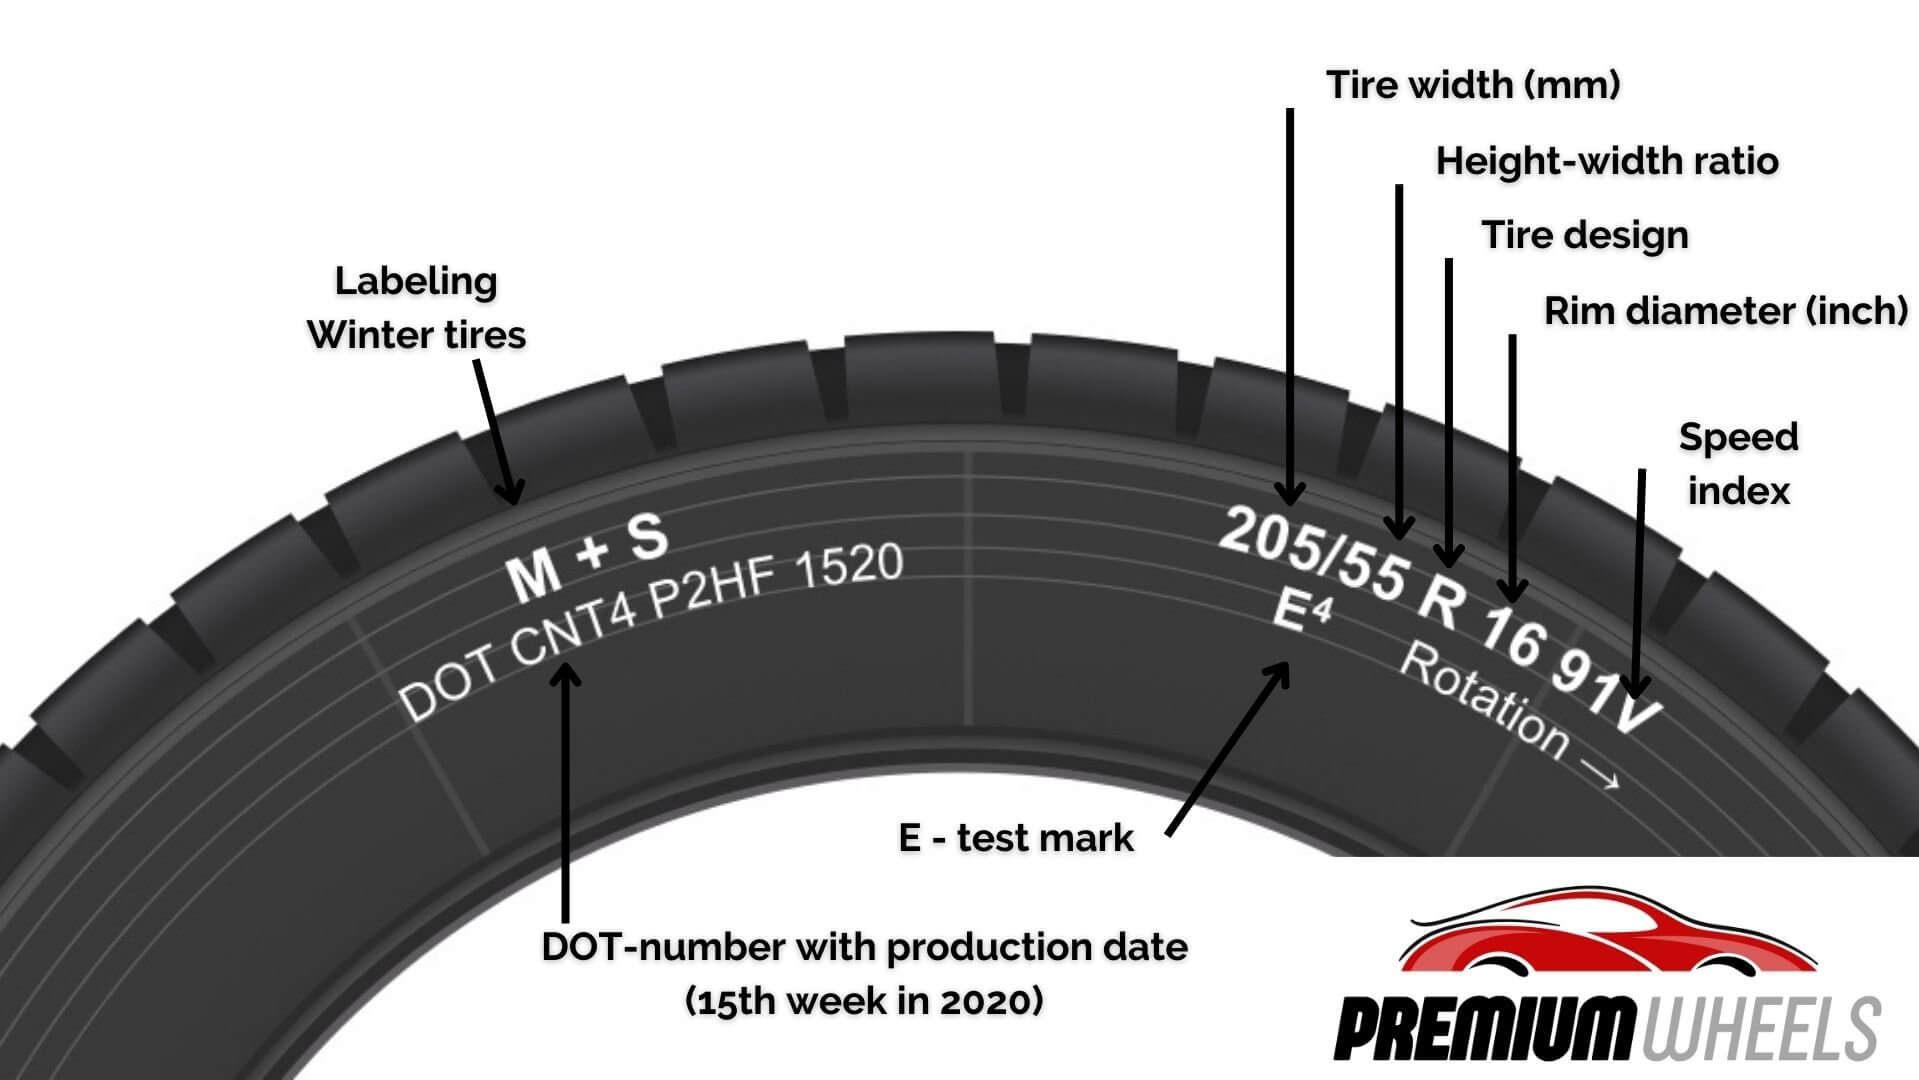
- P (or metric absence): Indicates the intended vehicle class, where P stands for passenger vehicle and no letter means a metric Euro-metric standard.
- 215: The section width measured in millimeters from sidewall to sidewall.
- 65: The aspect ratio, meaning the sidewall height is 65 percent of the tire’s total width.
- R: The internal radial construction of the tire body plies.
- 15: The matching wheel rim diameter required, measured in inches.
Avoiding Common Sizing Pitfalls
A frequent mistake drivers make is ignoring the aspect ratio when shopping for a slightly wider or narrower replacement tire. Changing the middle number alters your overall sidewall height, which directly throws off your speedometer accuracy and vehicle clearance. Always verify that your new tire’s width and aspect ratio match your vehicle manufacturer’s original factory specifications for 2026 driving safety.
How to Step-by-Step Interpret Load Index, Speed Ratings, and DOT Dates
Decoding the final segments of the tire sidewall ensures you purchase safe, compatible replacements. The load index and speed rating appear immediately after your tire size dimensions, usually formatted as a two-digit number followed by a letter, such as 91V.
The load index represents the maximum weight a single tire can support when properly inflated. According to the National Highway Traffic Safety Administration (NHTSA), a rating of 91 corresponds to a maximum capacity of 1,356 pounds. Always cross-reference this number with the vehicle placard located on the driver-side door jamb.
Decoding the Speed Rating Letter
The letter directly following the load index indicates the maximum safe operating speed for that tire under ideal conditions. Here is how to interpret standard modern ratings:
- Locate the letter suffix on your sidewall, such as S, T, H, V, or W.
- Match the letter to standardized tables. For instance, an S rating is certified up to 112 mph, H up to 130 mph, and V up to 149 mph.
- Ensure your replacement tire matches or exceeds the original manufacturer speed rating to maintain handling stability.
Reading the DOT Manufacturing Date Code
Safety experts strongly advise replacing tires that are more than six years old, regardless of tread depth. Find the letters DOT followed by a series of numbers and letters. The final four digits represent the manufacturing age.
- Scan the inner rim area for the four-digit stamp enclosed in a slight oval.
- Read the first two digits as the manufacturing week (01 to 52).
- Read the final two digits as the production year. A code ending in 2425 indicates the tire was manufactured during the 24th week of 2025.
What If It Still Doesn’t Work?
If your tire sidewall data is heavily worn, damaged by curb scuffs, or completely illegible, standard interpretation methods will fail. When critical numbers cannot be deciphered, follow these fallback steps to ensure vehicle safety:
- Check the secondary tire information placard permanently affixed inside your vehicle’s driver-side door jamb or glove box to find original equipment sizing.
- Consult the official vehicle owner manual or digital manufacturer database to confirm exact factory load index and speed rating requirements for 2026 models.
- Inspect the matching tires on the opposite side of the axle, as they typically share identical sizing and manufacturing specifications.
- Visit a certified local tire retailer or dealership service center for a professional inspection if safety specs remain ambiguous. Professional tread and sidewall evaluations typically range from complimentary to $30.
- Avoid driving on tires with unknown load capacities or structural sidewall bulges, as catastrophic failure risks increase significantly.
Conclusion
Mastering how to read a tire sidewall empowers you to select accurate replacements, monitor rubber aging, and maintain optimal vehicle safety on the road. By systematically checking dimensions, load indexes, and DOT date stamps, you prevent costly purchasing mistakes. According to verified research and expert sources from safety regulatory bodies, checking these specifications twice a year significantly reduces the risk of tire-related highway incidents. Your immediate next step is to head out to your vehicle with a flashlight and decode your current tire specifications today.
❓ Frequently Asked Questions
What does a tire size code like P215/65R15 mean?
This standard code tells you the tire type (P for passenger), section width in millimeters (215), aspect ratio (65), internal construction (R for radial), and rim diameter in inches (15).
How do I determine the maximum pressure a tire can handle?
Look for the ‘MAX LOAD’ and ‘MAX PSI’ stamping on the lower sidewall near the rim. This indicates the absolute maximum inflation pressure when the tire is fully loaded.
What is a tire load index and how is it used?
The load index is a numerical code (like 95) that corresponds to the maximum weight a single tire can support when properly inflated. You can cross-reference this number on a standard tire load chart.
What do the speed rating letters represent?
Speed ratings use letters (such as S, T, H, V) to designate the maximum safe speed a tire can sustain under recommended load conditions. For instance, an H rating is certified up to 130 mph.
How do I read a tire age code?
Find the letters ‘DOT’ followed by a series of characters ending in four numbers. The last four digits represent the production date, where the first two digits are the week and the last two are the year.
What is UTQG and where is it found on the sidewall?
UTQG stands for Uniform Tire Quality Grading, which rates tires on treadwear, traction, and temperature resistance. These grades are stamped clearly on the sidewall to help consumers compare tire durability.