A sudden tire puncture can transform a routine drive into a precarious situation, often leaving drivers feeling stranded and uncertain. The immediate challenge is not just identifying the damage but understanding how to execute a temporary, safe repair to reach a service station. Many lack the knowledge and tools for this essential roadside skill, potentially leading to prolonged delays or unsafe driving conditions. This comprehensive guide will empower you to master the practical application of a tire plug kit, offering a step-by-step procedure to confidently address punctures and understand the critical safety parameters for effective temporary repair in 2026.
Understanding Tire Plug Kits: Components, Types, and Limitations
Before delving into the repair process, it’s essential to understand the fundamental mechanics and inherent limitations of a tire plug kit. As an industry veteran, I’ve seen countless drivers misunderstand its purpose, treating it as a permanent solution, which it fundamentally is not. A tire plug kit is a roadside emergency tool, designed to get you safely to a service center for a professional, internal patch repair.
Components of a Standard Tire Plug Kit
Most comprehensive tire plug kits, suitable for a DIY enthusiast or professional, contain several key components:
- Reamer Tool (Spiral Probe): This cylindrical tool with a textured, spiral tip is used to clean, deburr, and slightly enlarge the puncture hole. Its rough surface prepares the hole for optimal plug adhesion.
- Insertion Tool (Split-Eye Needle): Featuring a handle and a pointed, split-eye needle, this tool is designed to thread and forcefully insert the rubber plug into the prepared puncture.
- Rubber Repair Strings/Plugs: These are sticky, self-vulcanizing strips of rubber, often coated with a chemical compound, which form the actual seal within the tire. For this guide, we will primarily focus on these string plugs due to their widespread availability and ease of use.
- Rubber Cement or Lubricant: While some plugs are pre-lubricated, a small tube of rubber cement or a dedicated lubricant often accompanies the kit. This aids in insertion and enhances the sealing properties of the plug by promoting a chemical bond with the tire’s rubber.
- Accessories: Many kits include additional tools such as pliers for extracting the puncturing object, a utility knife for trimming excess plug material, and a tire pressure gauge for reinflation.
Types of Tire Plugs: Focus on String Plugs
While various tire repair methods exist (e.g., rope plugs, mushroom plugs, patch-plug combinations), this guide emphasizes the practical application of string plugs. These are the most common type found in roadside repair kits. Mushroom plugs, for instance, are inserted from the inside of the tire and require dismounting, making them unsuitable for emergency roadside repairs without specialized equipment.
The Temporary Nature and Permissible Repair Area
It’s crucial to understand that a tire plug is a temporary repair. It seals the external hole but does not address potential internal damage or the structural integrity of the tire carcass. Think of it as a bandage, not a cure. Leading tire manufacturers, such as Michelin and Goodyear, explicitly state that a plug alone is not a permanent repair solution. Their guidelines, standard across the industry, often permit only tread-area punctures up to 1/4 inch (approximately 6mm) in diameter to be repaired. Punctures outside this specific criteria—especially in the sidewall, shoulder, or near the bead—are deemed irreparable by plugging due to the high flex and stress in these areas, which can compromise the repair and lead to catastrophic tire failure.
For instance, a nail embedded squarely in the center of your tire’s tread can often be temporarily plugged. However, a similar nail found just an inch or two from the sidewall, or a sidewall tear, immediately disqualifies the tire from a plug-only repair. These areas undergo significant flexing and stress, making a plug ineffective and highly dangerous. The goal is always to get the tire to a professional who can dismount it, inspect it internally, and apply a proper patch-plug combination from the inside out, which is considered a permanent repair.
Diagnosing Tire Punctures: Identification, Assessment, and Safety Protocols
The most critical step before attempting any repair is a thorough and accurate diagnosis. Misidentifying the puncture or its location can lead to an unsafe repair that jeopardizes vehicle stability and passenger safety. This section will guide you through the process of identifying, assessing, and ensuring the safety of your repair attempt.
Systematic Methods for Puncture Identification
Discovering a flat or low tire is often the first indication. To pinpoint the exact location and nature of the damage:
- Visual Inspection: Carefully examine the entire tire surface, rotating it slowly. Look for embedded objects like nails, screws, glass, or any visible cuts or abrasions. Don’t forget to check the inner and outer sidewalls.
- Listening for Air Leaks: If the tire isn’t completely flat, you might hear a faint hissing sound of air escaping. Move your ear around the tire’s circumference to locate the source.
- Soapy Water Solution: This is the most reliable method. Mix dish soap with water in a spray bottle or cup. Spray or pour the solution over the suspected puncture area. Air escaping from the tire will create visible bubbles at the exact point of the leak. This is particularly useful for slow leaks or tiny punctures.
Assessment Criteria for Plug Suitability
Not all punctures can, or should, be plugged. Consider the following:
- Location: Crucially, the puncture must be within the central tread area. This means the flat part of the tire that consistently contacts the road. Any damage to the sidewall, shoulder (the rounded edge where tread meets sidewall), or bead area (where the tire seats on the rim) is irreparable with a plug.
- Size: The hole should be relatively small, typically caused by a nail or screw. Industry standards generally limit plug repairs to punctures no larger than 1/4 inch (6mm) in diameter.
- Type of Damage: Plugs are effective for simple penetrations (e.g., from a nail or screw). They are not suitable for large cuts, tears, gashes, punctures at severe angles, or impacts that may have compromised the tire’s internal structure.
Consider this scenario: you find a long screw deeply embedded in the very center of your tire’s tread. This is a prime candidate for a plug repair. Conversely, discovering a jagged piece of metal near the sidewall, or multiple small punctures clustered together, immediately flags the tire as irreparable by a plug and requires professional assessment or replacement.
Essential Safety Protocols
Safety is paramount. Never attempt a tire repair without adhering to these protocols:
- Secure Vehicle: Park on a firm, level surface away from traffic. Engage the parking brake firmly.
- Wheel Chocks: Place wheel chocks on the wheels diagonally opposite the tire being repaired to prevent any accidental movement.
- Personal Protective Equipment (PPE): Always wear sturdy gloves to protect your hands from sharp objects and eye protection to guard against debris or accidental slips of tools.
- Vehicle Support: If lifting the vehicle is necessary, use a robust jack and always supplement it with jack stands for stability. Never work under a vehicle supported only by a jack.
When a Tire is Irreparable with a Plug
Recognizing irreparable damage is as important as knowing how to repair. A tire cannot be safely plugged if it has:
- Punctures in the Sidewall or Shoulder: These areas flex too much, preventing a plug from sealing effectively.
- Multiple Punctures: More than one puncture in close proximity can weaken the tire’s structure.
- Large Cuts or Tears: A plug cannot seal significant damage.
- Tread Separation or Internal Damage: Indicated by bulging, bubbles, or cords showing through the rubber. These are signs of catastrophic structural failure.
- Puncture Greater Than 1/4 inch (6mm): The plug material won’t adequately fill and seal a larger void.
According to the National Highway Traffic Safety Administration (NHTSA), improper tire maintenance contributes to over 11,000 crashes annually. A correct initial diagnosis of your tire’s damage is not merely a convenience; it’s a critical safety measure that prevents potentially unsafe repairs and avoids becoming another statistic.

Mastering the Tire Plug Kit: A Step-By-Step Procedure for Effective Repair
With proper diagnosis and safety protocols in place, you are ready to perform the temporary repair. This step-by-step guide is designed to help you understand and execute each action with precision, enhancing your confidence in roadside emergencies in 2026 and beyond. This procedure focuses on the widely available and practical string plug repair.
📋
Step-by-Step Guide
Ensure your vehicle is securely parked on a level surface with the parking brake engaged and wheel chocks in place. If the puncturing object (e.g., a nail or screw) is still in the tire, mark its exact location with chalk or a marker. Use pliers to carefully and steadily extract the object. A quick, sharp tug is often effective. If the object has already fallen out, locate the hole precisely, using soapy water if necessary, and mark it.
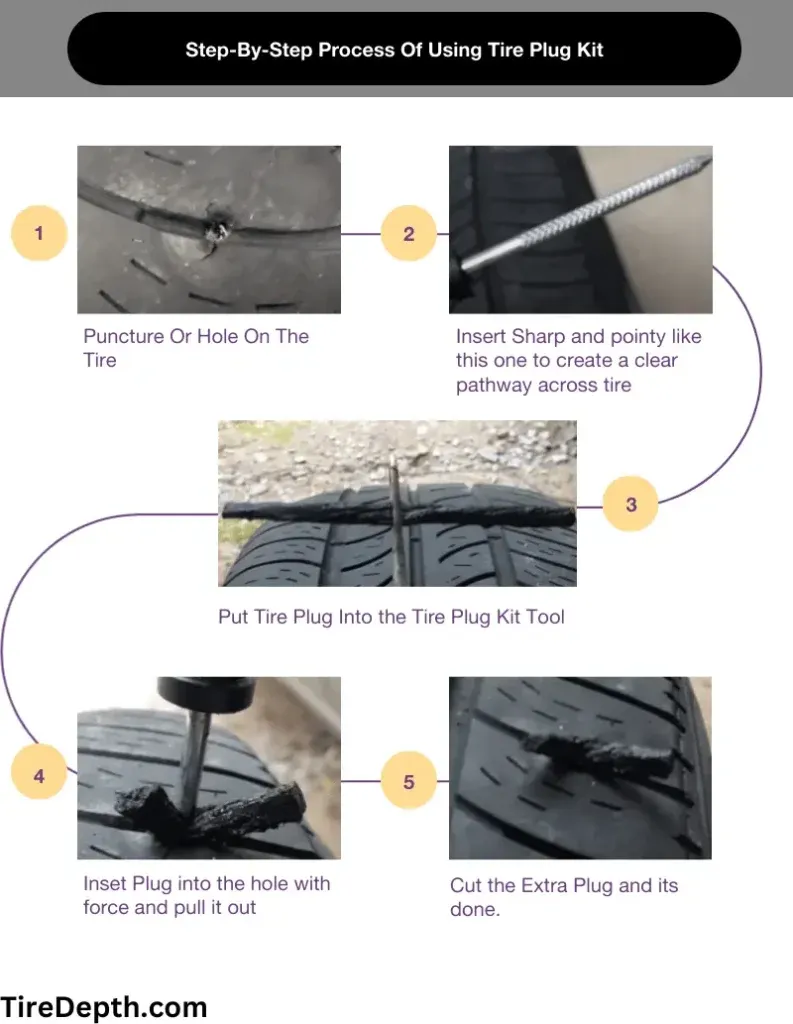
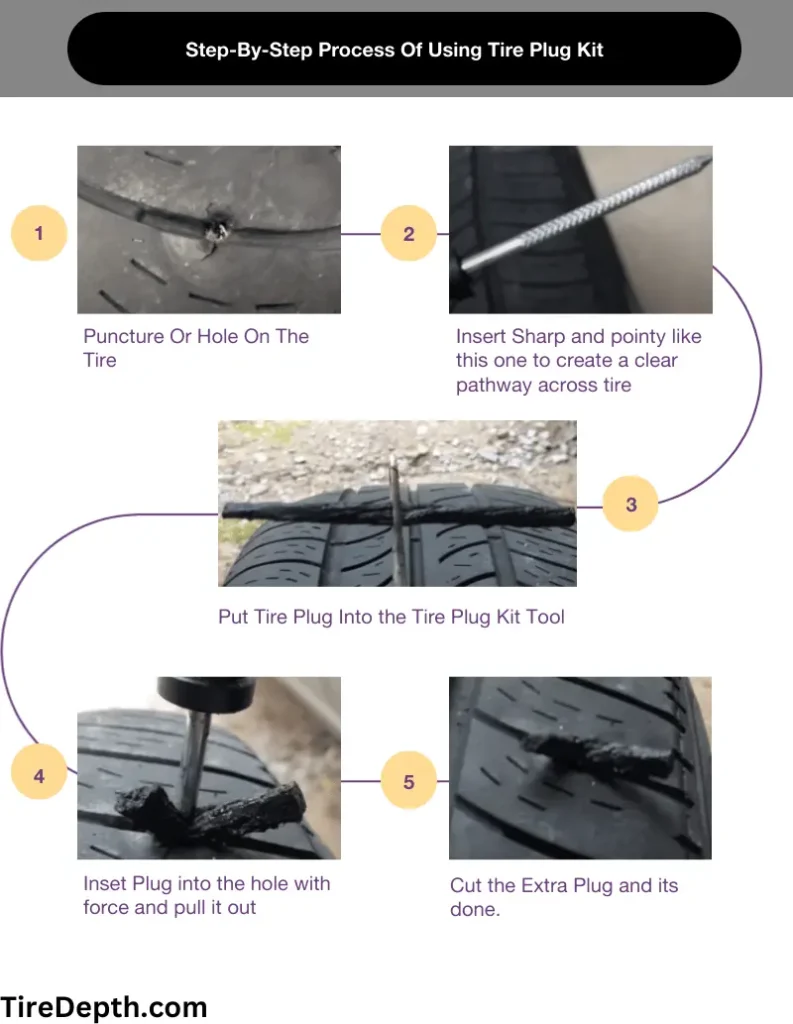
Take the reamer tool. With firm, steady pressure, insert the reamer into the puncture hole. Work the tool in and out of the hole, rotating it slightly, to clean out debris, deburr the edges, and uniformly enlarge the hole. This action creates a clean surface for the plug to adhere to and ensures a snug fit. Continue reaming until the tool moves in and out with moderate resistance, indicating the hole is ready for the plug. The goal is to make the hole slightly larger than the plug itself, not to tear it open.
Thread one of the rubber repair strings (plugs) through the eye of the insertion tool. Ensure that an equal amount of the plug extends from both sides of the tool’s eye. If your kit includes rubber cement or a lubricant, apply a generous amount to the entire length of the plug string. This lubricates the plug for easier insertion and, more importantly, helps create a strong, airtight seal through chemical vulcanization once inside the tire.
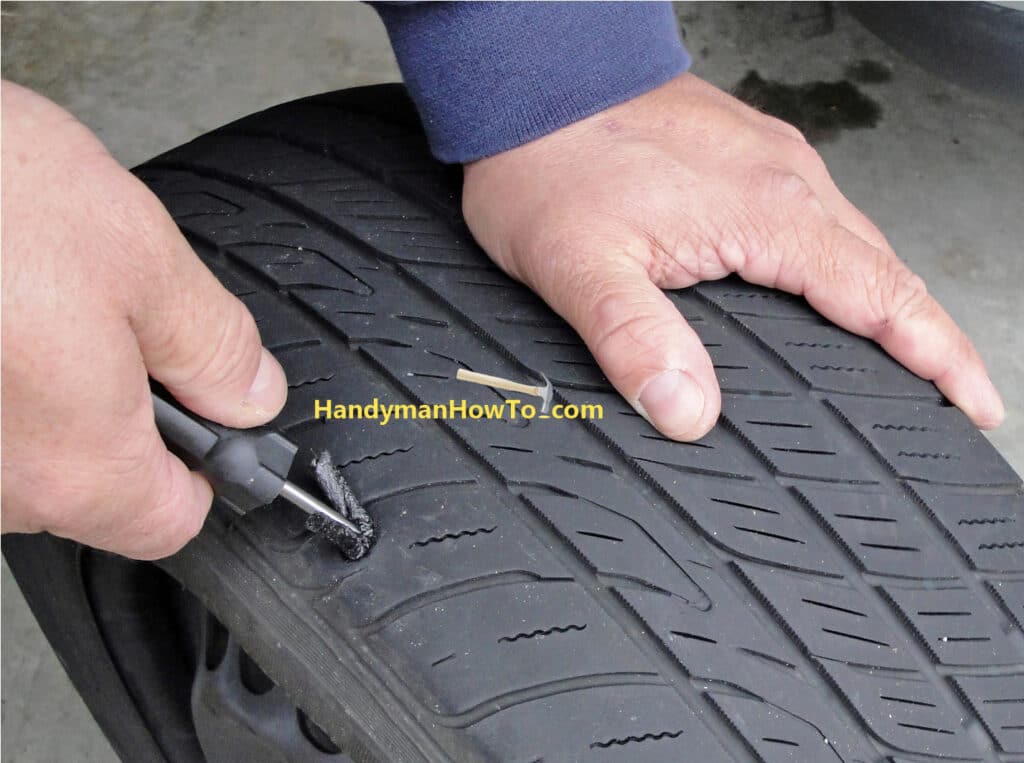
Align the plug-loaded insertion tool with the reamed hole. With a single, continuous, and forceful motion, push the tool straight into the puncture. You will feel resistance, but it’s crucial to push hard enough so that approximately 1/2 inch (about 1 cm) of the plug string remains visible outside the tire. Do not push the plug completely through the tire. The goal is to create a tight, compressed seal. This step requires significant force, so brace yourself and the tire if necessary. A properly seated plug will compress within the tire, creating a robust seal.
Once the plug is correctly seated, remove the insertion tool. Pull the tool straight out with a swift, rotating motion. The split-eye design allows the tool to separate from the plug, leaving the plug firmly in place. Next, use a utility knife or razor blade to trim any excess plug material protruding from the tire. Trim it flush with the tire tread, or as close as possible without cutting into the tire itself. This prevents the plug from catching on road debris or creating an imbalance.
Reinflate the tire to the vehicle manufacturer’s recommended PSI (Pounds per Square Inch). Always refer to your vehicle’s placard (usually located on the driver’s side door jamb, glove compartment, or fuel filler flap) for the correct pressure, as this is critical for safety, handling, and fuel efficiency. Once reinflated, spray your soapy water solution directly onto the newly plugged area. Observe carefully for any air bubbles, which would indicate a persistent leak. No bubbles mean a successful temporary seal.
Perform a final visual inspection of the plugged area. If no leaks are detected and the tire is at its optimal PSI, you are ready for a cautious road test. Drive conservatively, avoiding high speeds, sharp turns, or sudden braking for the first few miles. Pay close attention to any changes in vehicle handling or abnormal noises. Monitor the tire pressure vigilantly using your gauge for the next 24-48 hours. Optimal tire pressure is critical for vehicle safety and fuel efficiency; deviations of just 5 PSI can lead to significant issues like increased rolling resistance, reduced grip, and accelerated tire wear.
When reaming the hole, maintain a straight line with the angle of the puncture. This ensures the plug follows the path of the damage, maximizing the seal. If you apply rubber cement, allow it a moment to become tacky before inserting the plug for a superior bond.
Post-Plug Procedures and Long-Term Safety Considerations
Successfully plugging a tire is a commendable roadside skill, but the task is only half-complete. As a seasoned expert, I cannot stress enough that a tire plug is a temporary solution. Your next steps are crucial for ensuring your long-term safety and the integrity of your tire.
Immediate Actions Post-Repair
- Vigilant Pressure Monitoring: For the first 24-48 hours after plugging, frequently check the tire pressure with a reliable gauge. A slight initial pressure drop might occur as the plug settles, but consistent or significant loss indicates a compromised seal.
- Conservative Driving: Immediately after plugging, drive cautiously. Avoid highway speeds (generally above 50-60 mph or 80-100 km/h), sudden acceleration or braking, and aggressive cornering. This allows the plug to fully cure and settle into the tire’s structure.
The Urgency of Professional Repair
The primary purpose of a tire plug is to provide enough inflation to safely reach a professional tire service center. It is critical to understand that a plug addresses only the external hole. The Rubber Manufacturers Association (RMA) guidelines, which are widely accepted across the automotive industry, explicitly state that a plug alone is not a permanent repair. A proper, permanent tire repair requires the tire to be dismounted from the wheel, thoroughly inspected for internal damage, and then repaired with a combination patch-and-plug unit that seals the injury from the inside and fills the puncture channel.
Ignoring this step can lead to significant problems. Imagine a scenario where you’ve successfully plugged a tire. It holds air perfectly, so you decide to defer professional service. While the external hole is sealed, the puncturing object might have caused unseen internal damage to the tire’s plies or liner. This damage, if not addressed by an internal patch, can worsen over time, leading to tread separation, belt damage, or a sudden, catastrophic blowout at speed. A patch-plug combination, installed by a qualified technician, ensures the structural integrity of the tire is restored.
Potential Risks of Prolonged Plug Use
Relying on a plug for an extended period carries inherent risks:
- Plug Degradation: Over time, exposure to road elements, heat, and tire flexing can cause the plug material to harden, shrink, or lose adhesion.
- Internal Tire Damage: As mentioned, unaddressed internal damage can propagate, leading to structural failure.
- Increased Risk of Sudden Deflation: At highway speeds, the forces on a compromised tire are immense. A failed temporary plug can lead to a sudden and dangerous blowout.
Recommendations for Replacement
Even with professional repair, some tires may warrant replacement. Consider this if:
- The tire exhibits signs of significant damage beyond the puncture (e.g., sidewall damage, large cuts, multiple closely spaced punctures).
- The plug fails to hold pressure reliably, even after being checked and potentially re-plugged.
- The tire is old, worn past its tread wear indicators, or nearing the end of its service life.
Never attempt to plug a tire that has been driven flat for an extended period. Even if the puncture is in the tread, driving on a severely underinflated tire can cause irreversible internal damage to the sidewalls, making any repair unsafe and unreliable. Always have such a tire professionally inspected.
Troubleshooting Tire Plugs: Addressing Common Issues and When to Seek Professional Help
Even with careful execution, challenges can arise during or after plugging a tire. Understanding common issues and knowing when to escalate to professional assistance is crucial for maintaining safety and preventing further damage. My years in the field have shown that even experienced hands can encounter unexpected scenarios.
Common Issues and Troubleshooting Techniques
- Plug Not Seating Properly / Difficulty Inserting:
- Issue: The plug won’t go in or requires excessive, unsafe force.
- Troubleshoot: Re-ream the hole thoroughly with the reamer tool. Ensure the hole is clean and slightly enlarged. Apply more lubricant or rubber cement to the plug. Sometimes, a slightly larger diameter plug (if available in your kit) might be needed for a marginally larger hole.
- Continued Slow Leak After Plugging:
- Issue: Bubbles still appear around the plug after reinflation and initial test.
- Troubleshoot: This indicates an incomplete seal. Gently push the plug deeper if possible, or try wiggling it slightly to help it seat. If this fails, extract the old plug and attempt the repair again with a new plug, ensuring proper reaming and lubrication. It’s possible the original puncture wasn’t a clean entry and has micro-fissures around it.
- Plug Coming Out:
- Issue: The plug has dislodged, especially after driving.
- Troubleshoot: This usually means the hole was either too large, not properly reamed, or the plug wasn’t adequately seated. At this point, a second DIY attempt is risky. It’s time for professional assessment.
Indicators That Professional Help is Required
There are definitive situations where DIY repair ends, and professional intervention becomes mandatory. Ignoring these indicators can have severe consequences:
- Persistent Air Loss: If, despite multiple attempts, the tire continues to lose air pressure at the plugged site, the integrity of the tire or the nature of the puncture is beyond a simple plug repair.
- Puncture Outside the Tread Area: As reiterated, any puncture in the sidewall or shoulder renders the tire irreparable by a plug, regardless of size. These areas are not designed to withstand the forces of a plug and will inevitably fail dangerously.
- Visible Tire Damage Beyond a Simple Puncture: This includes bulges on the sidewall, exposed cords, deep cuts, or tread separation. These are signs of severe structural damage that demand immediate tire replacement. A plug won’t fix these issues and could mask dangerous internal problems.
- Uncertainty About Repair Integrity: If you have any doubt whatsoever about the effectiveness or safety of your repair, do not risk it. Professional technicians have specialized equipment to inspect the tire’s internal structure and perform a compliant, permanent repair.
- Puncture Exceeding 6mm (1/4 inch): Many vehicle and tire manufacturers recommend against repairing tires with punctures larger than this, deeming them irreparable for safety reasons. Attempting to plug such a large hole is ineffective and dangerous.
Consequences of Improper Repair
The dangers of an improper tire repair cannot be overstated. Consequences can range from inconvenient to catastrophic:
- Premature Tire Failure: The tire may fail prematurely, often without warning, due to internal damage exacerbated by an incomplete repair.
- Catastrophic Blowout: A sudden, high-speed blowout can lead to loss of vehicle control, severe accidents, and serious injury or fatality.
- Vehicle Instability: An improperly repaired tire can affect handling, braking, and overall vehicle stability, making driving unsafe.
- Safety Hazards: Beyond the immediate vehicle, a tire failure poses a risk to other road users.
Even if a plug appears to hold perfectly, professional inspection is always recommended. Technicians can identify hidden damage and apply a combination patch-plug that permanently restores the tire’s integrity according to industry standards. This ensures your safety and maximizes the lifespan of your tire.
By The Numbers
Max Puncture Size (approx. 6mm)
Crashes Annually (Improper Tire Maint.)
Deviation from Optimal Pressure
Tire plugs are temporary solutions for tread-area punctures, not permanent fixes. Proper diagnosis and safety protocols are paramount before any repair attempt. A systematic, step-by-step approach ensures effective plug insertion and sealing. Ultimately, professional internal patch repair is crucial after a plug to maintain tire integrity and ensure long-term safety. Equipped with this knowledge, you are now prepared to address common tire punctures with confidence and competence. Always prioritize safety and seek professional automotive service promptly after implementing a temporary plug repair to ensure your vehicle remains safe and reliable on the road.
Frequently Asked Questions
Is a tire plug a permanent fix for a puncture?
No, a tire plug is considered a temporary repair. While it can effectively seal a puncture to restore tire pressure, it does not internally reinforce the tire’s structure. Industry standards, such as those from the Rubber Manufacturers Association (RMA), recommend following up a plug with an internal patch performed by a professional technician for a lasting, safe repair.
When should you NOT plug a tire?
You should never plug a tire if the puncture is located in the sidewall or shoulder area, if it’s larger than 1/4 inch (6mm), or if there are multiple punctures in close proximity. Additionally, if the tire shows signs of internal damage, tread separation, or is severely under-inflated for an extended period, a plug is unsuitable and replacement is required.
How long can a tire plug last?
The longevity of a tire plug varies significantly based on driving conditions, the quality of the plug, and the initial puncture. While some plugs might hold for thousands of miles, they are not designed for long-term use. It is crucial to have the tire inspected and permanently repaired with an internal patch as soon as feasible, ideally within a few days, to ensure safety.
Can I plug a tire on the sidewall?
No, you absolutely cannot plug a tire on the sidewall. The sidewall of a tire flexes considerably during driving, and a plug in this area will not hold securely due to the structural stress and thinner rubber. Attempting a sidewall repair is extremely dangerous and significantly increases the risk of a catastrophic tire failure, necessitating immediate tire replacement.
What tools are essential in a basic tire plug kit?
A basic tire plug kit typically includes a T-handle reamer tool for cleaning and enlarging the puncture, a T-handle insertion tool for pushing the plug into the tire, and several rubber repair strings (plugs). Some kits may also include rubber cement or lubricant for the plug, and a small utility knife for trimming excess material.